This document was originally a pamphlet that accompanied classes I taught in the East Kingdom of the Society for Creative Anachronism, Inc.
This document is provided as is without any express or implied warranties. While every effort has been taken to ensure the accuracy of the information contained, the author assumes no responsibility for errors or omissions, or for damages resulting from the use of the information contained herein.
Permission is granted to make and distribute verbatim copies of this document for non-commercial private research purposes provided the copyright notice and this permission notice are preserved on all copies. Website mirroring is permitted by express prior arrangement. Permission will only be granted if the document is posted in its entirety and the content and format of the document remain completely unaltered by the mirroring site. The definitive version of this document resides at http://www.mfgraffix.com/hird/faoilt/stencil.html.
| Back to Faoiltighearna's Page | Introduction | Style 2 | Examples |
Style 1
By Lady Faoiltighearna inghean mhic Ghuaire
Copyright © 1999 Margo Farnsworth
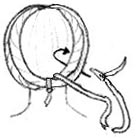
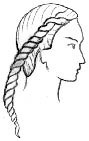
- Divide hair down the middle. Clip one side of hair up so that it is out of the way.
- Pick up a small section of hair from the very front of this side of the head. Give this section of hair several
downward twists. Hold this twist in your left hand.
- Pick up another small section of hair, twist it down a few times, and cross it over the first twist. Drop the
first twist so you can hold the new one in your left hand.
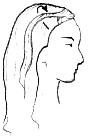
- Now pick up the twisted strand that you just dropped, along with the next section of hair to be added.

- Twist this now slightly bigger section of hair down as you cross it up over the twist held in your left hand.
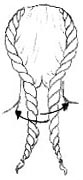
- Repeat steps 4 & 5 until all the hair on your right side has been gathered and twisted. Continue twisting the
sections downward and crossing over in the same direction as before to create a rope. Secure the end.
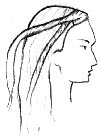
- Repeat with the left side of the head. Cross the ends and wrap around to the top of the head.
- Affix the ends to the top of the head with a clip.
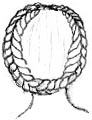
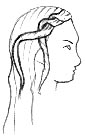
- Take a 2 yard piece of ribbon and loop it around both braids at the nape of the neck and knot, leaving a 2
inch piece on the short end. Using a large needle with a blunt end start sewing the braids down to the head,
securing it by sewing under the hair next to the scalp. Keep the ribbon fairly snug. At the points where the
ends of the braids land, make a stitch at a backwards angle to create and “X”, this helps keep the ends from
popping out. Once you are at the top of the head, you can remove the hair clip. When you have reached
the nape of your neck again, wrap the ribbon once around the head in front of the braids. When you reach
the nape of the neck again, tie off to the short piece that was left at the beginning.